Author: William Boettcher

Hardwood Floor Refinishing Services

If your hardwood floors are looking dull, scuffed, or scratched, you may want to consider refinishing them. Hardwood Floor Refinishing Bergen County NJ is a much cheaper option than replacing your flooring.Floor Refinishing

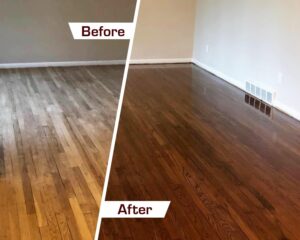
Refinishing entails sanding the existing wood and staining it a new color. We offer both oil-based and water-based polyurethanes.

All furniture will need to be removed from the room prior to applying the finish. We will schedule a time to apply the final coat of finish with you.

Hardwood floor refinishing is a process that involves sanding, cleaning, staining, and sealing the wood floors. If your hardwood floors are starting to show signs of wear and tear, it’s a good idea to call in a professional flooring contractor to come and refinish them. This process will take a few days, so it’s best to choose a time that works well for your schedule.

Before refinishing your hardwood floors, you’ll want to clear the area and remove any furniture from the room that will be sanded. You should also apply plastic sheeting to the doors of your home to keep dust from migrating into other areas of the house. The sanding process can create a lot of dust, so it’s important to close windows and shut off vents in the room where you’re working.

Once the sanding is done, you’ll need to clean your floor thoroughly to remove any dust and debris that may have settled on the surfaces. You should then wipe the floor down with a cloth or mop that’s dampened with water or a mild solvent like mineral spirits. This step is especially important if your floors are darker, as dirt and dust can mar the finish.

The next step in the refinishing process is to screen the floor, which is a light sanding of the surface that’s done with an electric sander. This step isn’t always necessary, but it’s a great way to restore the beauty of your hardwood floors. It’s important to sand with the grain of the wood and use light pressure when screening the floors.

After the floor has been screened and cleaned, you can begin staining the hardwood floors. This is the final step before you can move your furniture back into the rooms. It’s important to follow the stain manufacturer’s directions when staining your floors. If you are using a water-based stain, it can take up to 24 hours for the stain to dry completely.

Refinishing your hardwood floors will help preserve them for years to come, and it can improve the overall look of your home. It’s also a great way to get rid of the craters and crevices that can attract unwanted pests.

Sanding

Getting a professional to do the job is usually more cost-effective than doing it yourself, although you will need to buy sanding disks and stain or polyurethane. This can add up, especially if you want to experiment with different stains. Plus, a pro will have the proper tools and experience to make sure the job is done properly.

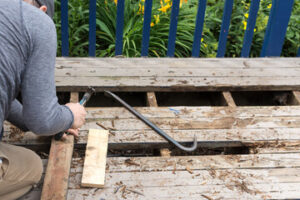
Before starting sanding, the floor should be completely clear of furniture, wall hangings, window treatments, and anything else that might get in the way or be damaged during the process. This also means pulling up any heating grates and carpet tacks that may be embedded in the wood flooring. Then, sweep the floor and vacuum it thoroughly to remove dust and dirt. Next, if there are any gouges or chips in the wood flooring that need to be repaired, this should be done with wood putty and left to dry.

When refinishing hardwood floors, it’s best to use a vacuum-equipped “dustless” sanding machine, as this will reduce the amount of dust that is kicked up during the sanding process. However, if you don’t have this equipment, then you will need to sweep and vacuum the floor frequently to rid it of the excess dust. Regardless of what type of sanding machine is used, it’s important to sand in the direction of the grain. This will help create a smooth surface and prevent the wood from becoming warped over time.

It’s also important to note that sanding will not completely remove deep scratches, gouges, or stains. This is because it only takes off about 1/16 inch of the existing surface, so damage that is deeper will still be apparent once the new finish is applied.

If your floors are in good condition and just need a refresh, it may be possible to skip the sanding process altogether and just buff the floors and apply a new coat of polyurethane. This is called screening and recoating, and it’s a great option for people who have appropriated floors that aren’t quite ready for a full refinish.

Staining

While wood floors are a beautiful addition to any home, they can become damaged and dull over time. Whether from normal wear and tear or water damage, it’s important to understand that there are options to restore them. One option is resurfacing, but another is refinishing. Refinishing is more extensive, but it can help improve the overall appearance of your floor and increase its lifespan.

Staining is an important process that should be done with care. It can be difficult to get the color right, and even the slightest misstep can result in a completely different color or shade than you originally intended.

This step can be messy, so it’s essential to protect your skin and clothing by wearing rubber gloves and a mask. It’s also wise to have a few rags on hand to wipe off excess stains and help maintain a clean working surface. This is especially true if you’re using a water-based stain. This type of stain is more likely to smear than oil-based stains and can be difficult to remove once it’s dry.

It’s also important to thoroughly stir your stain before applying it. This will ensure that all of the liquid is well mixed and doesn’t contain any uneven pigments. It’s also a good idea to apply the stain in small sections to avoid overworking the wood, which can cause it to look blotchy.

Once the stain is applied, it’s important to let it soak in before wiping it down with a cloth or sponge. This will help to create a visually appealing base coat and reduce the likelihood of flaws or streaks.

Depending on the color you’re going for, it may be necessary to apply a second coat. If you’re unsure of how much stain to apply, consult a professional. They can provide you with samples of various shades and recommend how much to apply.

It’s also a good idea to use a t-bar or similar tool to pop the grain prior to staining. This will open up the pores of the wood and make it less likely to appear blotchy after your stain is applied. This is a vital step, particularly for dark stains or those that will be refinished with water-based polyurethane.

Finishing

A new coat of finish will give your floors the last touchups they need as well as provide a fresh and appealing color. A lambswool applicator is the best tool to use for this part of the process. It allows for a smooth and even application of wood stain and can be stored in a plastic bag overnight for use again.

When you’re ready to apply the final coat, it’s a good idea to keep all furniture out of the room. Also, close all windows and doors, and tack down any loose floorboards with finishing nails. Finally, cover any vents or doorways in the room with tarps to protect them from sawdust.

While this might seem like a lot of work, it’s worth it to have beautiful floors. It’s best to do this refinishing project in stages rather than all at once and take your time as you go. This will allow you to better focus on the process and get your work done correctly.

Once your floors have been sanded, they will need to be vacuumed and mopped to remove any dust or debris left behind. Then they can be sprayed with a hardwood flooring cleaner or your own mix of 10 parts water to 1 part white vinegar. Next, hand-sand the perimeter of your hardwood areas using 180-grit sandpaper. This will get into any nooks and crannies that the floor buffer missed, as well as any edges around the baseboards.

After sanding, the floor will need to dry completely before you can recoat it. This is a good opportunity to clean the hardwood and to wipe down cabinets or other surfaces in the room as needed. Once the floor is dried, you can choose between a water-based polyurethane, a water-resistant polyurethane, or an oil-based stain. Oil-based finishes are slower to dry and smell worse, but they offer a superior sheen.

It’s important to determine whether your hardwood floor needs a full refinish or simply a recoat. If the floors are still in good shape and don’t have deep scratches or gouges, a screen and recoat may be all that is needed.

How to Avoid Common Deck Repairs

Most outdoor decks need a good cleaning and, occasionally, repairs. Generally, widespread surface damage is a sign of structural issues and a reason to call Pro Deck Builders Charleston.Deck Repairs

Look for loose ledger boards (the long, pressure-treated board that attaches the deck to your house). If the ledger is rotting, it could cause the entire deck to collapse.

Termite damage can ruin your home and cause thousands of dollars’ worth of repairs. These tiny pests can eat through any wooden structure in your home, and they can damage structural beams and load-bearing walls. In order to protect your home, you must have a licensed pest professional exterminate the termites and make the necessary repairs. Fortunately, the damage caused by termites can often be repaired by using wood hardeners or fillers.

When applying the repair materials, you should always remove the concrete down to the top layer of steel reinforcement in order to ensure that there is a minimum 3/4-inch mechanical bond between the repaired area and the rest of the deck. This also prevents overly thin applications of repair material that may not perform well. This is particularly important for repairs to precast deck panels (PCPs).

If you suspect that your home has been damaged by termites, you should contact a qualified pest control specialist to exterminate the termites and inspect the damage. If the damage has been severe, you may need to replace structural boards or beams. If the termite infestation is not treated in a timely fashion, it can spread to other areas of your home and cause even more damage.

It is also a good idea to schedule annual termite inspections with a certified expert to help prevent future problems. Other preventive measures include reducing conditions that attract termites, such as avoiding wood-to-soil contact, maintaining proper ventilation, removing dead trees and bushes around the house, and avoiding overmulching.

Mold and algae

If you’ve seen dark splotches of green, black, or gray on your deck, that’s not just an eyesore—it could be a sign of deeper problems. Mold and mildew aren’t just a surface problem; they can grow into the wood itself and cause structural damage over time. The first step to fixing the problem is to use a chemical treatment to kill the fungi and their roots.

You can try a household product, such as white vinegar, or you can use a deck cleaner that contains chlorine bleach to kill the mold and mildew at the root. You can spray it on the whole deck or just the affected areas, and then scrub with a stiff push broom or a scrub brush to remove as much of the fungus as you can. After the deck is clean, rinse it thoroughly with a garden hose and then let it dry completely.

The best way to prevent mold and mildew from developing in the first place is to make sure that your deck gets plenty of sun and doesn’t become damp or overly shaded. Also, make sure that your deck is well-ventilated so that moisture and heat don’t build up underneath the surface. If your deck is a covered porch, you can open windows and use fans to help prevent this issue.

Green mold, which is a fungus, can be a serious health hazard for humans and animals. It releases microscopic spores into the air that can then spread to other surfaces in your home and contaminate indoor spaces. In addition, the spores can deteriorate and decompose wood, which can lead to rot or even structural damage.

A professional can use a chemical treatment that will destroy the mold and mildew at the root so that it doesn’t return. They can also replace any boards that have been damaged by the fungus and seal them to prevent future infestations. This can involve unscrewing or unnailing the fasteners that hold the board in place, cutting a new board to size, and then screwing or nailing it back in place.

Rotted or broken boards

The beams and joists beneath your deck act as the support system, so they are particularly susceptible to water damage over time. If you see signs of rot, it is important to catch the problem early before it worsens and potentially weakens the rest of your deck. A professional may recommend replacing the affected joist rather than simply repairing the surface boards.

You can check for rot by using an ice pick or long-shaft screwdriver with a fine point. Apply slight pressure to the point of the ice pick and see how easily it travels into the wood. If it requires a lot of force, this indicates that the wood is rotted and must be replaced. If you do decide to replace the joist, choose lumber that is as close in color and variety to the existing board as possible. Install the new joist with hangers that extend into the deck and house, as opposed to just using screws, for increased strength and safety.

Cracking and warping of deck boards is normal, but it can become a serious problem when the cracks go too far. This causes the boards to separate from each other and can create trip hazards for anyone running around on bare feet. The wood can also start to crumble, and the cracking could expose nails or screws and lead to further deterioration of the boards.

It is possible to do some deck repair on your own, especially if it involves cleaning and surface maintenance. However, any repair that requires heavy equipment rental or advanced carpentry skills should be left to a professional contractor. Trying to save money by doing these repairs yourself can end up costing you more in the long run, as these types of jobs can be dangerous and require expertise. A reputable contractor will be able to give you an estimate of how much the job should cost before starting. They will also be able to recommend the best course of action for your particular deck and its specific problems. This will prevent you from spending more than necessary on a repair or replacement.

Damaged Railings

Wooden deck railings are a popular choice for their natural, woodsy look. However, it’s important to keep in mind that they can be more prone to damage than metal or plastic railings. Wood is also subject to expansion and contraction, which can lead to loose or cracked parts. If your deck has wood railings, you should check for any signs of wear and tear regularly. This is especially important if you have children or pets who use the railings.

Loose or cracked boards can be repaired fairly easily. In most cases, homeowners will simply need to sand the board and then apply some epoxy to fill any cracks or chips. However, more serious repairs will require the help of a professional. This may include removing and replacing any broken or severely damaged pieces.

Stairs are another area of the deck that is often in need of repair. Wobbly stairs can be a safety hazard for anyone, and they should be anchored as soon as possible. This is usually a relatively simple task, and it can be completed in a day or two by most professional contractors.

If your deck has wood or metal railings, the hardware that affixes them to the deck can become rusty and loose over time. This can be caused by exposure to rain and moisture. In some cases, this can be fixed by removing any rust from the bolt holes and then using anchoring cement or metal epoxy to reattach the railing.

The foundation of a deck is made up of footings and concrete pads that are installed under each post that supports the deck. When they aren’t buried deep enough, the soil can move and cause the deck to heave up. Footings can be reinstalled by a professional in most cases, but the cost will vary depending on where you live.

It’s essential to inspect your deck for any signs of rot, mold, or other problems. It’s also a good idea to have an experienced professional take a look at the structure and joists in general, especially if you have any customizations that need to be addressed.

Repairing Your Roof Without a Roofing Contractor

If your roof is in need of repairs, a roofing contractor can help. Before climbing on your roof, you need to make sure you have the right ladder and safety equipment.

roofing

During a storm, wind can blow shingles off your roof. Replacing a damaged shingle or two is pretty simple if you have a little bit of DIY in you. First, determine the extent of the damage. If the shingle is simply cracked or torn, you don’t need to replace it. Apply a thick bead of roofing sealant (about $4 per 10-oz tube) over the crack and spread it with a putty knife. Weigh it down with a brick and leave it in place for 24 hours to ensure the sealant sets.

If the shingle is missing, loosen the nails holding it with a flat bar or pry bar. If the shingle is missing the entire top tab, you will have to remove the whole shingle and replace it with a new one. If the shingle is only partially missing, remove just the damaged portion and replace it with a shingle strip or tab.

To prevent further damage, re-seal the area of the roof where the shingle was removed. For example, if the nail hole is exposed, fill it with roof cement using a caulking gun. Also, re-caulk around chimney flashing, vent pipes, and any line of roof cement where two surfaces meet.

The lifespan of asphalt shingles is about 15 to 30 years. But if you are not diligent about routine roof maintenance, you might have to repair it more frequently.

When you notice that shingles are damaged, it may indicate that your roof is overdue for an inspection and cleaning. A damaged roof is a serious problem, especially since moisture can cause structural damage to the house and mold problems in the walls, ceilings, and furnishings.

If you have a roof that needs repairs, it’s best to hire a professional. A quality contractor will inspect the roof and provide you with a quote. It’s important to choose a reputable company with experience and good references. Also, don’t forget to get several estimates. By doing your research, you can make the right decision for your home. A high-quality roof can protect your home from the elements for years to come.

Leaking Gutters

Gutters serve a vital function by collecting and dispersing rainwater to prevent water damage to your roof, walls, windows, foundation, and more. But when your gutters themselves start leaking, it can lead to serious problems.

Gutter leaks often occur at joints and seams where the gutter material has come loose due to expansion and contraction or where there is a hole in the gutter material. Leaking gutters are easy to repair, but you need to have the damaged area cleaned and prepped for a sealant application. This includes scraping and scrubbing away any rust spots, spraying down the gutter with a water hose, and wire-brushing the area to ensure that the caulk or tape adheres well.

Depending on the extent of the gutter leak, you may be able to patch up the hole with a piece of metal roofing patch or a metal-repair tape designed specifically for use in gutters. For more severe holes, it may be necessary to replace the entire gutter section.

Another common cause of leaking gutters is standing water that clogs the gutter, leaving no place for the water to go other than down the side of the house. This can lead to rot and sagging of the gutters, as well as stains on siding or other exterior surfaces. This can be prevented by installing gutter aprons, which are L-shaped lengths of metal flashing that attach to the edge of the roof under the shingles and angle down over the inside of the gutter, eliminating any gaps between the wall and the gutter and channeling the water into the gutter.

It’s also important to check your gutter fasteners regularly, as they can become loose or even pull away from the house fascia for a variety of reasons. This is especially true for older homes with deteriorating gutter hangers, which are usually made of galvanized steel and can corrode over time. To help prevent gutter hanger failure, have your roofers inspect the hangers and re-tighten them as needed. In addition, improving attic insulation and ventilation to prevent ice dams will help reduce the risk of leaky gutters from snow-related ice buildup in the winter.

Damaged Ridge Caps

The ridge cap is an important part of your roof because it helps protect it from water leaks. However, because it is located at the top of your roof and cannot be easily viewed from ground level, it is also one of the first parts of your roof to show signs of deterioration or damage. Therefore, it is important to have it regularly inspected by a roofing professional.

The most common reason for damaged ridge caps is because they were not properly installed when your roof was built. If the ridge cap is not properly attached to the rest of the roof, it can be pulled loose by high winds or by debris that gets blown onto your roof during storms. This can cause water to leak through the roof, causing severe problems for your home or business.

Another common reason for a damaged ridge cap is that it was not made of the proper materials. Ridge caps should be made of a thicker material than the rest of your roof shingles in order to hold up better against heavy rains and winds. Therefore, it is important to have your roof inspected by a professional roofing contractor in order to make sure that your ridge cap is constructed of the right materials.

Ridge cap shingles can be easily repaired by a skilled DIYer or by hiring a roofing contractor to perform more extensive roof repairs. In addition, the direction in which you nail ridge cap shingles is also an important factor in how long they will last. Therefore, it is important to have your ridge shingles nailed in with a longer roofing nail than you would use for other shingle types.

When you are installing a new ridge cap, it is recommended that you apply roofing cement to the underside of the shingle before you nail it down in place. This will help to ensure that the ridge cap is securely fastened in place and will stay on your roof for a long time. In addition, it is a good idea to install your ridge cap shingles in a pattern that matches the existing shingles on your roof in order to keep the appearance of your home or business uniform.

Damaged Roof Tails

The most vulnerable part of any roof is the area around the ridges and hips. During high winds, these areas can be lifted and displaced from their original positions. This leaves gaps and holes that expose the underlayment to moisture and can significantly reduce the lifespan of your roof. These holes and cracks should be repaired as soon as possible to avoid costly damage to your interiors and the structure of the building envelope itself.

These gaps can be filled with plastic roofing cement mixtures. They won’t be as decorative as full replacements, but they will stop the water, wind, and cold from damaging your internal walls and furniture. If the damage is extensive, a roofer may need to replace the damaged tiles.

Hairline cracks in your roof are not only unsightly; they can also decrease the insulation value of your home and contribute to energy loss. These tiny cracks can be caused by a number of factors, including debris falling on the roof, freezing weather, the stresses of water or snow, and even human error such as people stepping on the tiles or spraying salt to try to melt ice.

When a tile is damaged, you can repair it by pushing up a piece of metal flashing and securing it with shingle cement. Then, take a cup of colored granules and sprinkle them over the repaired area to camouflage the repair.

The Rewarding Career of a Roofer

Roofers install, repair, and replace roofs made of a variety of materials, such as shingles, metal, rubber, thermoplastic, and asphalt.Roofer

Roofers may work in residential, commercial, or industrial settings. They usually climb onto rooftops to do their jobs, so they should have good balance and manual dexterity.

A good local roofer knows the ins and outs of your community, including any building regulations and requirements that must be met. This helps them plan and install your roof correctly and make sure it adheres to any city codes. They also know that weather can make a big difference on your roof, so they’re prepared for whatever climate quirks might be common in your area.

Another great reason to hire a local roofing contractor is that they can offer you better wages and benefits than non-union contractors. Union members receive superior wage and benefit packages, health and medical coverage, overtime pay, and pensions (after meeting eligibility requirements). In addition to these benefits, they have a strong collective bargaining structure that puts them on an equal footing with their employers.

The union’s national headquarters is in Washington, DC, with 22,000 members participating in nine regional district councils across the country. These local unions work to improve their members’ salaries, benefits, and working conditions.

As a union member, you’ll earn a higher pay rate than non-union workers, and your employer will likely provide health insurance under the national plan or through a local plan.

If you’re looking for a professional with a personal interest in your satisfaction, hire a local roofer. They know the ins and outs of your community, and they’ll take the time to understand how they can best serve you. They’ll be happy to answer any questions you have and will do their best to ensure that your roof is done right and on schedule.

One of the most rewarding aspects of a career as a roofer is the relationship you form with your clients. They want their jobs done right and are likely to recommend you to their network of trusted contractors if they think you are a good fit for their company. They have a lot of trust in you and will do everything they can to make sure your project is completed on time and within budget. They may also offer you a no-pressure discount for using their services in the future. In addition to the above-mentioned voodoo magic, they are more than willing to share their knowledge of roofing best practices with you.

Roofing is one of the most affordable home improvement jobs, and it’s also an excellent opportunity to save on your energy bills. Whether you’re in the market for an asphalt shingle roof or a metal roof, the right roofer can help you get the job done without breaking your bank.

You can find affordable roofers by shopping around and looking for coupons or discounts from your local building department or state consumer protection agency. You can also ask for estimates before committing to a job. Many contractors offer free quotes, but it’s always best to get written estimates in case disputes arise later on.

Some roofers specialize in storm damage, and they’ll come into your neighborhood after a tornado, hurricane, or hailstorm. They’ll offer to check your roof and help you file an insurance claim. They usually have multiple crews, and they’ll be able to get to your roof quickly and efficiently.

The best way to make sure you’re getting a good deal is to shop around and talk with other people who have had work done by the company you’re considering. This way, you’ll get a sense of how long it took to complete the job and if the customer service was good.

Another way to find an affordable roofer is by scheduling your work in the off-season. This can help you find a better price on materials and ensure that your roof isn’t damaged as a result of weather conditions.

Finally, you can look for roofers who are members of your community and can provide you with references. This can be done online or by calling the Better Business Bureau. You can also ask friends and family for recommendations.

Roofers are typically hardworking and reliable workers. They can work in a variety of settings, including residential and commercial buildings. They have a wide range of skills and are able to do a lot of different things, from replacing roofs to spraying materials to bind and seal a structure’s exterior.

The Qualifications of Expert Plumbers

Having an expert plumber in your house can save you money and headaches. Plumber has the skills, tools, and qualifications to do the job. This is because they can help you solve plumbing problems faster than you can. They can also save you money on future plumbing repairs.

PlumbingWhether you’re looking for a plumber to fix your plumbing problems or hiring one for your business, there are several qualifications you should be aware of. Plumbers need to be licensed and have years of experience working in the field. These requirements can vary from state to state.

Plumbers have to pass the state licensing exam and may need to have experience working on their own or with other plumbing contractors. They also need to be able to communicate well with customers. They can be hired for residential or commercial buildings and may also specialize in certain systems, such as water and gas lines. Getting an expert plumber can protect your home and family from potential problems. A good plumber will offer free in-home estimates, and he or she will break down costs for repair jobs.

Depending on your area, plumbing costs can range from $165 to $4,000. In general, plumbers charge by the hour for services. The cost of a plumbing job can be affected by several factors, such as the amount of time it takes to perform a job, the number of materials and equipment needed, and the job’s complexity. Getting an emergency plumber will always cost more than hiring a plumber at regular times. Most plumbers charge extra for weekends and holidays. They may also charge a trip fee, which covers travel expenses to job sites.

Keeping your home’s plumbing in tip-top shape can help you avoid costly emergencies. Getting a professional to inspect your plumbing system is a wise decision. You will not only have peace of mind, but you’ll also be saving money in the long run. It’s not uncommon to have a plumbing problem, but if it isn’t dealt with immediately, it can lead to costly repairs. Some of the most common plumbing problems include leaking pipes, faucets, and toilets.

You should first call a licensed plumber to get your plumbing system in working order. A licensed plumber is bonded and insured. The average cost to hire a plumber ranges from $45 to $150 per hour. Getting a plumbing job done right requires expert plumbers to use a number of different tools. Each plumber’s toolkit has a specific purpose. Some tools are more common, while others are used more frequently. Some tools are specialized for different types of pipes and fixtures.

A plumber’s plunger is a common tool that plumbers use to unclog drains. It can be used to remove a small clog, or to force the water through a large clog. A plumber’s tape is also a common tool used by plumbers. This tape is waterproof and can be used to seal leaks in joints. It can also be used to patch threaded joint connections.

Those looking to become plumbers need to have a variety of skills. These skills are not just technical but also include organizational, problem-solving, and interpersonal skills. In addition, they must be physically fit. Some plumbers focus on installing new systems, while others repair and maintain existing systems.

Expert plumbers are also known to have a dedication to the environment. They may also offer free consultations to customers after fixing their plumbing system. Some also offer service warranties.

Those looking to become plumbers may want to earn a college degree. They may also need to obtain a license from their state. Some states require yearly renewal. Regardless of the type of work you perform as a plumber, there are common safety precautions you should take to protect your employees and yourself from harm. These include the use of appropriate clothing and safety equipment.

The proper use of tools is one of the most important safety measures. Use only tools that are in good condition and appropriate for the job. Wearing safety goggles, gloves, and a mask are all important components of a good safety plan. A good safety plan should also include teamwork. It is always best to perform risky team tasks to ensure maximum safety.

Important Considerations When Choosing Commercial Building Contractors

Commercial building contractors are essential for a large construction project. These buildings require large amounts of materials, equipment, and building supplies. You may be looking for a company that can complete the construction on time and within your budget. The list of materials and equipment needed for this type of project includes plumbing, HVAC, paints, pigments, and furniture. Choosing the right contractor at https://www.homebuildersakronohio.com/ can mean avoiding many headaches down the road. Listed below are some important considerations when choosing a commercial building contractor.

home builder

The best construction contractors should be transparent, so you can read reviews online and see the quality of their work. It would help if you also were sure to find out how big their company is and whether they can handle projects in your city. Lastly, you should find out if they are properly licensed to offer commercial construction services in your area. Each state has different resources for licensing, and you should consult with your state’s licensing board for further information. A company should be licensed to work in your area.

In most cases, you will be working with a construction company that has a proven track record for quality work. If you are on a tight budget, it might be good to look at different construction companies and compare their capabilities. You will likely find that a few stand out as the best fit for your needs. If you are unsure which one to hire, you can always ask the construction company for recommendations. Most of them will be happy to help you with the project.

Once you’ve chosen a contractor, it’s important to get the plans and estimates. This is known as a bid. This proposal should be as detailed as possible, considering everything that is not included in the proposal, such as additional work you’d like to include. The bid should adhere to the same scope, so make sure to communicate the scope before submitting a bid. You can also choose the contractor based on their experience and reputation.

Once you have selected a commercial building contractor, it’s important to understand the scope of the job. The contractor you choose must have experience in the field you’re considering. A professional will advise you on what type of work is best for your project and what to avoid. It’s important to choose a commercial building contractor insured for the materials used and the work that the contractor will undertake.

Whether you’re building a new home or a business, hiring a professional is important. If you’re a first-time homeowner or a business owner, you’ll want to hire a contractor with experience in this field. A commercial building contractor can be a valuable resource for your project if you’re a landlord. Using a professional for your construction project will ensure that you get the best value for your money.

A commercial building contractor’s reputation is vital. A reputable company will provide top-notch quality work, which will last. If you’re hiring a general contractor, you’ll want someone who has experience in this type of construction. They’ll know how to navigate the various permits required for your project. They’ll also have good relationships with suppliers and subcontractors. As a result, they’ll be able to give you a competitive quote for the job.

While the cost of hiring a commercial building contractor is an important consideration for any construction project, you’ll also want to make sure that they’re fully insured. This is an important piece of insurance and should protect you if something happens. Moreover, an insured contractor is a good option because it’s cheaper than an uninsured one. You can also be sure that the project will be completed on time. Therefore, it’s vital to find a reliable company with insurance.

Choosing a trustworthy contractor should be based on several factors. A transparent company is better able to meet deadlines. A company with an impressive reputation will be able to meet your requirements. A transparent company will also have an online presence and provide its portfolio. In addition to checking their credentials, you should also know whether they’re licensed to perform commercial construction work in your area. Each state has different resources for licensing contractors. Nevertheless, it’s imperative to find a licensed company.